Introduction
The Multiplier is a personal game project I am creating and hoping to release this year. To make cutscenes and cinematics simple to create, I made a scripting system inside of Unity to streamline the cutscene creation pipeline.
How Does it Work?
This scripting pipeline first requires that a trigger area be marked as an interactable. This is how the game handles interaction with the world between the player and handles any GUI pop ups to indicate interaction. Once we get the message to play the sequence, either by the user pressing the interact button or marked as an instant interaction, we give our script runner the script to run and it’ll handle it until complete.

First I set up our trigger and interactable layer to hook onto the interaction callbacks.

This is the script that runs the cutscene shown above. It’s very straight forward, there are methods that take in parameters and handle the cutscene loop.
First we move our camera to the target transform ‘CameraPos01’, at a speed of 2 m/s, and the false indicates if we should wait for this to end, and the next false indicates if we should return the camera when finished.
Next we have the ‘Player’ look at the target transform ‘CameraPos01’, at a rotation speed of 100 degrees/s, and the false indicates if we should wait for this to end.
We Wait 1000ms then play our Dialogue called, ‘BeginDialogue2’, wait another 1000ms then we take the camera back and the cutscene is over.

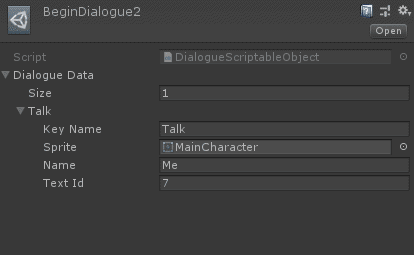
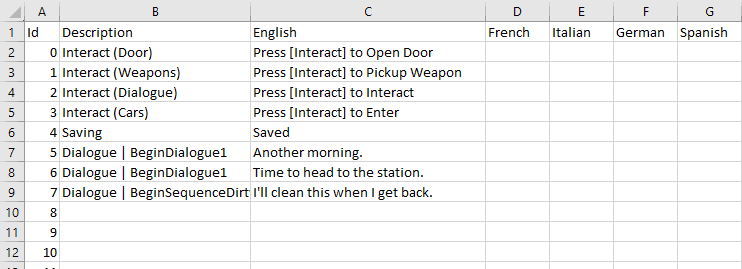
This is how ‘BeginDialogue2’ look like, it is a simple array of text along with a sprite and name for each one, in case we have different characters speaking in a dialogue script. The text id refer’s to the row in a excel sheet with all the dialogue in the game.

The system is very tidy and efficient, allowing me to seamlessly create cutscene as needed and change them with ease.
Processing the Script
The script is a string that is entered into a text box that requires each line to be seperated by an ending character, in my case ‘;’, and parameters be seperated into a begin character, ‘(‘, parameter seperator, ‘,’, and an ending character, ‘)’. The code for reading it is relatively straight forward.
public async Task RunScript(string scriptData)
{
    string[] lines = scriptData.Split(';');

    for (int i = 0; i < lines.Length; i++)
    {
        await RunLine(lines[i]);
    }
}

private async Task RunLine(string line)
{
    // Process line commands
    if (line.Contains("Wait"))
    {
        string[] variables = line.Split('(', ')')[1].Split(',');
        int milliseconds = int.Parse(variables[0]);
        await Task.Delay(milliseconds);
    }
}
Again, all we are doing is splitting the lines up into an array then getting an array of the parameters entered. Using .NET 4.x we are able to take advantage of Asynchronous methods, allowing us to add delays and timers to our code without needing to deal with coroutines through Unity.
Conclusion
This cutscene system works like a charm for a game like mine where cutscenes are not intended to be much more than some movement, camera movement, waiting, playing dialogue, and a few other things. If you’re making something very in depth and immersive, a more extensive cutscene pipeline would be required and you might benefit from using Unity’s Timeline system for cutscenes.


