Introduction
This week I updated the enemy AI in the game I am working on, The Multiplier, a top down shooter inspired by the early Grand Theft Auto games and Hotline Miami series. After watching the GDC talk on Fear’s AI, I was inspired to improve my game’s AI and implement a more goal oriented approach rather than the mush I had put together in a hurry.
First I outlined what I want my AI to be able to do and make it super modular so that later down the road I can implement new behaviors without interfering with the current implementation. I found OneNote being great at allowing me to keep notes and ideas all in one place. Here’s what I outlined,
- Stand Still
- Follow a waypoint path
- Pick up weapons and drop weapons
- Detect the player using ‘vision’
- Aim and fire their weapon
- Duck in cover (left, right, up)
Next I took a look at some of the things I wanted to implement and what I should work on before beginning. I already had implemented weapons and all functions relating to weapons (picking up, dropping, firing, aiming), next I had to implement a waypoint system and a cover system. I have no idea what is a ‘cover’ point yet and the simplest yet effective solution for defining cover points was physically placing objects in my level that represent cover points.
So I needed a whole meta-level editor. I created a system that allowed me to define groups of points, like rooms. I made a custom inspector element in Unity to make it more beautiful and simple for any level designers to use.

Here’s a level with two groups created. Every square gizmo is a point, W-Waypoint, S-Spawn, P-Cover.
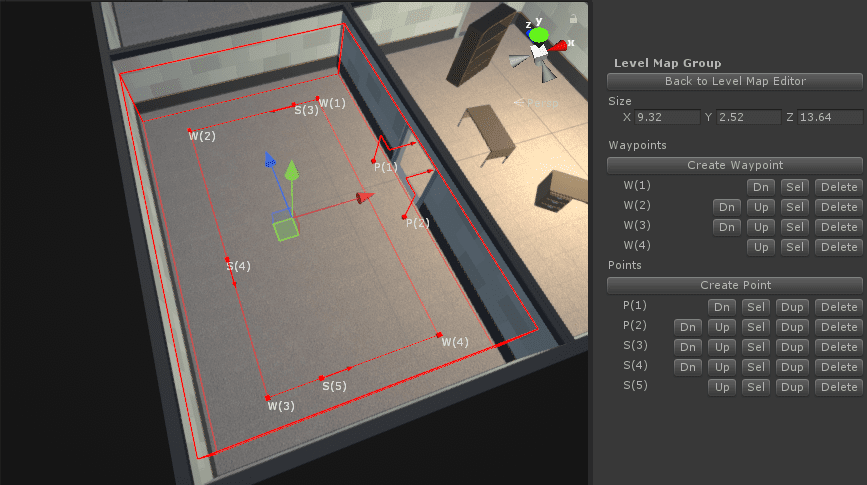
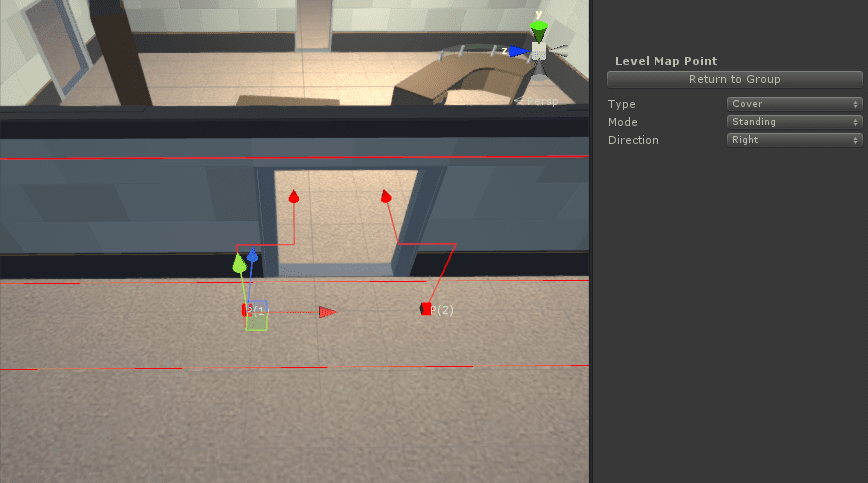
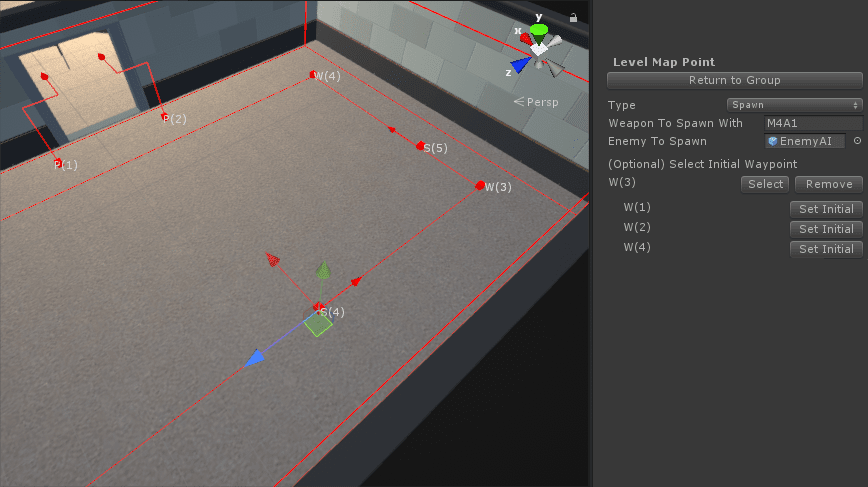
Here’s a view of each point except for the waypoint. Waypoints do not take any inputs, they simply mark their location. As you can see, spawn points can either be linked to a waypoint from the group it is in, or if none are selected then the spawned enemy will simply accept the rotation and position of the spawn point. If a waypoint is selected for a spawn point it automatically rotates to face the waypoint.
State Trees
So now that we know where cover points are, spawn points, and waypoints we can finally begin writing our AI. I planned how the behaviors should play out in a tree diagram I created using the draw.io tool. Here’s the tree I designed and based my AI off of.
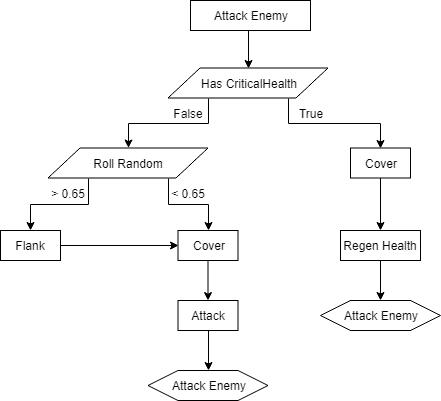
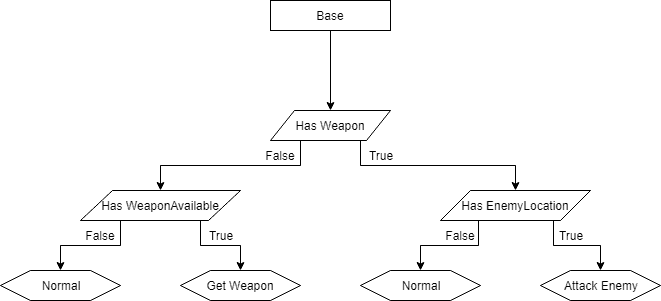
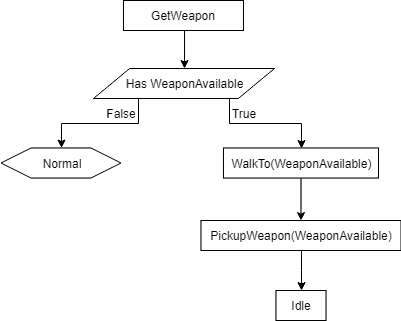
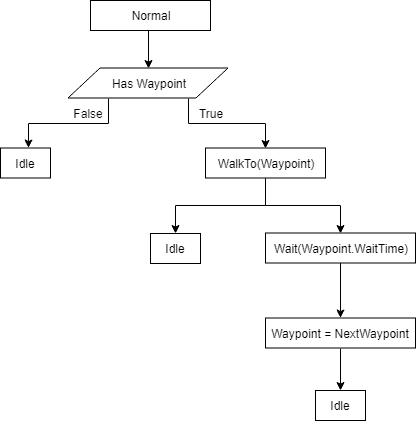
So every frame the AI would begin at the ‘Base’ tree then it would automatically transition to the according state based off it’s current parameters. In the ‘Attack Player’ tree I roll a random number between 0 and 1 to add a bit more logical diversity in the AI, I don’t want 100% of my AI to just attack from the front, I want some diversity, so AI have about 65% chance of flanking when first engaging the enemy (player).
Cover
Cover was a challenge to implement. The first challenge was deciding which cover point to enter, with up to over 10 different points in a group we need to organize and determine which would be most efficient and best for us. I wrote an algorithm that returned the best cover point. This algorithm goes through every cover point that isn’t already taken, checks if its far enough from the player but also not too far. It also check to make sure its either in front of the player or behind depending on whether or not we are flanking. With the remaining points, we find the closest one to our location and run to it.
The next challenge was implementing the actual covering behavior. How often should we peak out? What if we get hit? What if this point is no longer viable? Using timers to update our current cover point, peaking, and hit detection solved this issues but required a bit of fine tuning.
Vision and Communications
We need to ‘see’ the player before being able to engage them. I create a cone of rays at the height of the head of the enemy and shoot them in the current rotation direction.
Communication between AI is done through the Level Map Group that they are in and in a set interval of 1 second. The Level Map Group will go through every enemy in its bounds and look for information other agents should have, like the current player from their vision. The level group compiles a JSON string with things other enemies know and then distribute that JSON string to every other enemy in that group. Enemies then each decompile that string and set any variables they do not know, providing for a modular and efficient communications system.
Bullet Damage and Crouching in Top Down
This was a headache to do. In top down you cannot aim up or down on the Y axis, so if an enemy or player is crouching they cannot be damaged at all. This is perfect if a target is sitting behind cover but what if you go around cover and shoot them while they are crouched? It should hit them.
The way I solved this was by expanding the hitbox to be the same as when they are standing, when crouched. Next our projectile when impacting their target will check if they are crouching. If they are we will cast a ray from the target to the shooter with the origin being the target but with the y position set to their crouch height. If the ray successfully hits the shooter this means the path was clear of any obstacles, making the hit successful, otherwise there is something in between meaning they are in cover and it ignores them.
Take Aways and Lessons Learned
This AI has yet to be explored by the general public but with the testing done so far it seems like a solid creation but I am sure it will receive a few more iterations before release. So take these lessons with a grain of salt.
When creating AI you want to make it as predictable as possible so that user’s aren’t left guessing what the AI’s next actions will be. You want some mystery but not enough that would confuse the user.
Timers are important and delicate creatures. When writing timers double it. I have timers for when its time to refresh the cover point, originally I had about a 10s timer, which resulted in WAY too much AI movement. Doubling it fixed this problem and resulted in more ‘calm’ enemies. Also add a delays. I used 0.3s as a delay for the enemy to process they are seeing the player. I also used a .5s delay between the enemy being damaged and actually processing they have been hit.
Use the Gizmos tools Unity has or whichever game engine’s visual debugging tools has. It makes debugging non-intended behavior SO much easier. The Handles.Label utility included in Unity is a life savor for visually debugging strings.
I hope I provided some insight onto my decision making for any other developers who are undertaking a similar challenge.
