Splines are used in many aspects of Game Development and are incredibly useful. Some examples of where splines shine include,
- Moving UI along a path
- Spawning Objects along a path
- Moving an AI Agent along a pre-defined path
- Procedural Generation of Roads, Rollarcoasters, Vegetation, and other types of meshes
- Drawing trees and graphs that are aesthetically pleasing
- And much much more!
But when you try to investigate how exactly you can do this on your own you get hit with complex equations and calculus and matrices. This is totally unnecessarily complex and really keeps self-taught and less mathematically inclined developers away from reaching their true potential. I am writing this post to give a detailed yet understandable explanation on how to go about implementing a spline generation system.
This specific implementation is called a Bézier Curve. This is a specific type of spline that takes in a list of points and creates a smooth line between the first point to the final point using the points in between to influence its curve. Here’s an example.
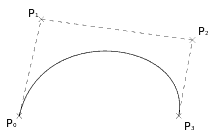
As you can see, Point 1 and Point 2 act as ‘handles’ for the curve generation. If you’ve ever used an animation program like Maya or played with the curve node editor in Unity, you notice it gives you handles to affect the curve. This is the same concept.
So how do we go about creating it in our game?
For this blog for simplicity, I will be creating a script that strictly handles 4 points, a begin and end point, and handle for each point. This is how it looks for example,
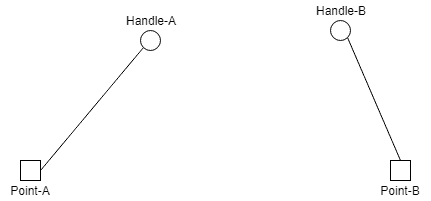
What we want to do is create a smooth line going from Point-A to Point-B that uses Handle-A and Handle-B as effectors for our final output.
First we want to draw a line from Point-A, to Handle-A. Handle-A to Handle-B. and Handle-B to Point-B. Then we want to get a point between each of those lines. For example this is how it will look when we get a point halfway between each other (50%).
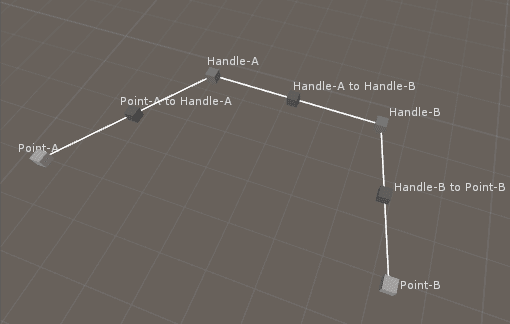
Next we want to draw a line between ‘Point-A to Handle-A’ and ‘Handle-B to Point-B’ and get the value between those at the same value that we got the others, 50%. Here’s how it looks.

This ‘Final’ point is now our point along the curve that we generated for 50%. Now as we alter our percentage we get this nice curve, here’s a video of it in action.
So there it is! This works with as many points as you want, you can even have a single handle. In that case you’d get a point between Point-A to Handle, then a point between Point-B to Handle, and get the point between those two. Same thing for when you add more and more points.
I hope I’ve helped any developers who were struggling to incorporate more complex concepts into their development workflow because of the fear of the complex and scary math equations. Let me know of any feedback or questions you may have!
